
Barron Webster

Connor Brewster

Joe Thom

Szymon Kaliski
We recently spent a few months making ports easier to work with on Replit, so you can develop more complex apps predictably.
What are ports?
When a computer receives a TCP/UDP request, ports define which program that request should route to. (If you need a more basic explanation of TCP ports, start here).
On a normal computer, you only have one layer of ports: your programs define a port that they listen to, and when traffic hits that port on your computer from the internet, it gets routed to the appropriate process. Some protocols have defined standard ports — for example, Simple Mail Transfer Protocol Secure (SMTPS), the email protocol, generally listens on port 587, and most web servers listen on either port 80 (HTTP, unencrypted) or port 443 (HTTPS, encrypted).
You can think of ports like mailboxes. Imagine those big mailrooms in skyscrapers that ensure the mail lands in the right mailbox — the mail is the data being sent and received, and the mailboxes are the ports.

This is how it works for a basic computer: different ports route different traffic to the right program on the computer.
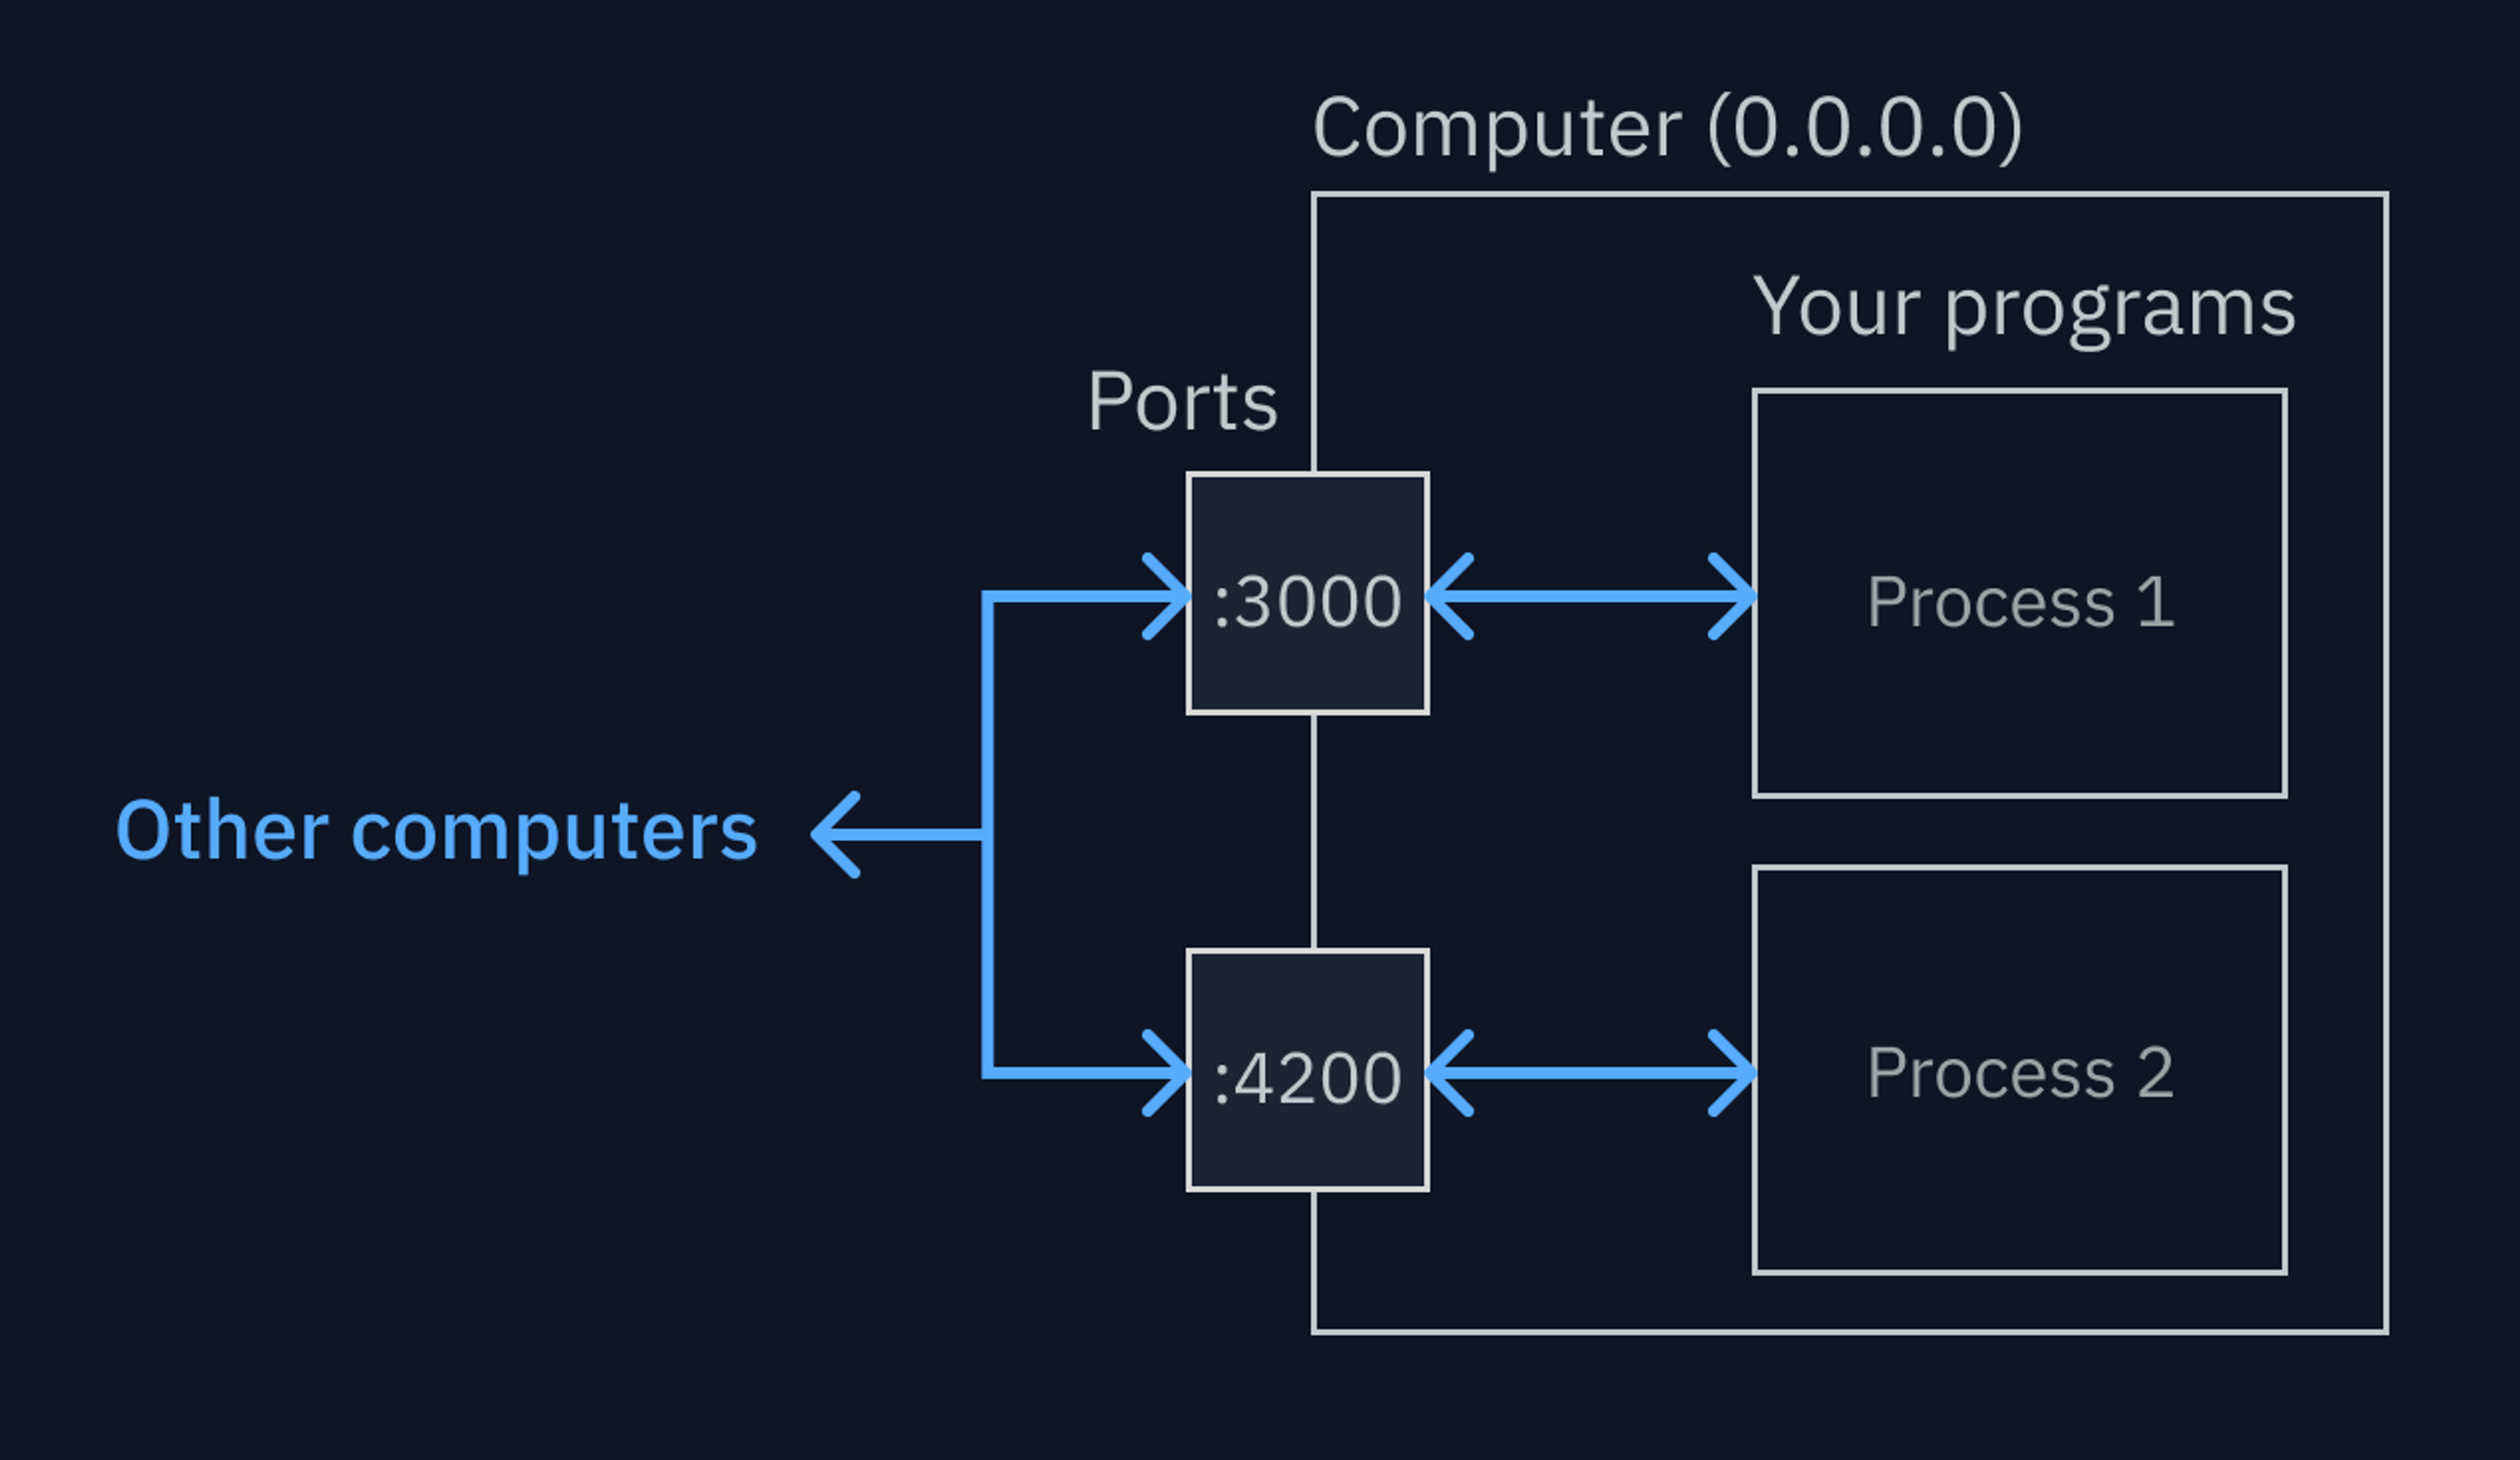
The 0.0.0.0 part is the address, or host. If a process decides to listen on 0.0.0.0, that means it should listen on every network interface on that computer (internal or external). Whenever another network-connected computer sends a request to that port on your computer’s external IP address, the process will see it (or, more technically, the router for your network will correctly route that request — read more about NATS on Wikipedia).
Managing ports isn’t trivial even on a normal computer. Because Replit runs your projects in a cloud environment, managing ports becomes even more complicated — your Repls are all basically computers within other computers, so there are many more ways for things to go wrong. To start, there are two layers of ports for data to travel through: one to connect to the computer hosting your Repl, and one for the Repl itself.

Past pain points on Replit
Before we did this work, there were a lot of pain points for port management on Replit:
You couldn’t preview localhost ports, because they’re only accessible on the internal network
Most frameworks will not listen on 0.0.0.0 in development, because you don’t necessarily want your work exposed to the public while you’re working on it. Instead, they’ll typically listen on a different address — 127.0.0.1 (otherwise known as localhost). This is an internal network interface — which means only that computer itself can make requests to ports on that address. It’s also relative — if you go to a localhost link on your computer, it can only see processes inside that computer. That works great when you’re developing locally on your own computer — it means you can develop without being bothered by security requirements, passwords, and the like — but in a Repl, you’re connecting to a computer in the cloud. You’re not inside the network on that computer, you’re connecting externally. That means by default, you can’t access localhost ports.
This meant that for many development frameworks (Express, Flask, Next.js, the list goes on) you would have to manually set the process to listen on 0.0.0.0 to see it previewed on Replit. If you were new to a framework, or you didn’t know that the issue was because of localhost, it was hard to figure out what the problem was and how to fix it.
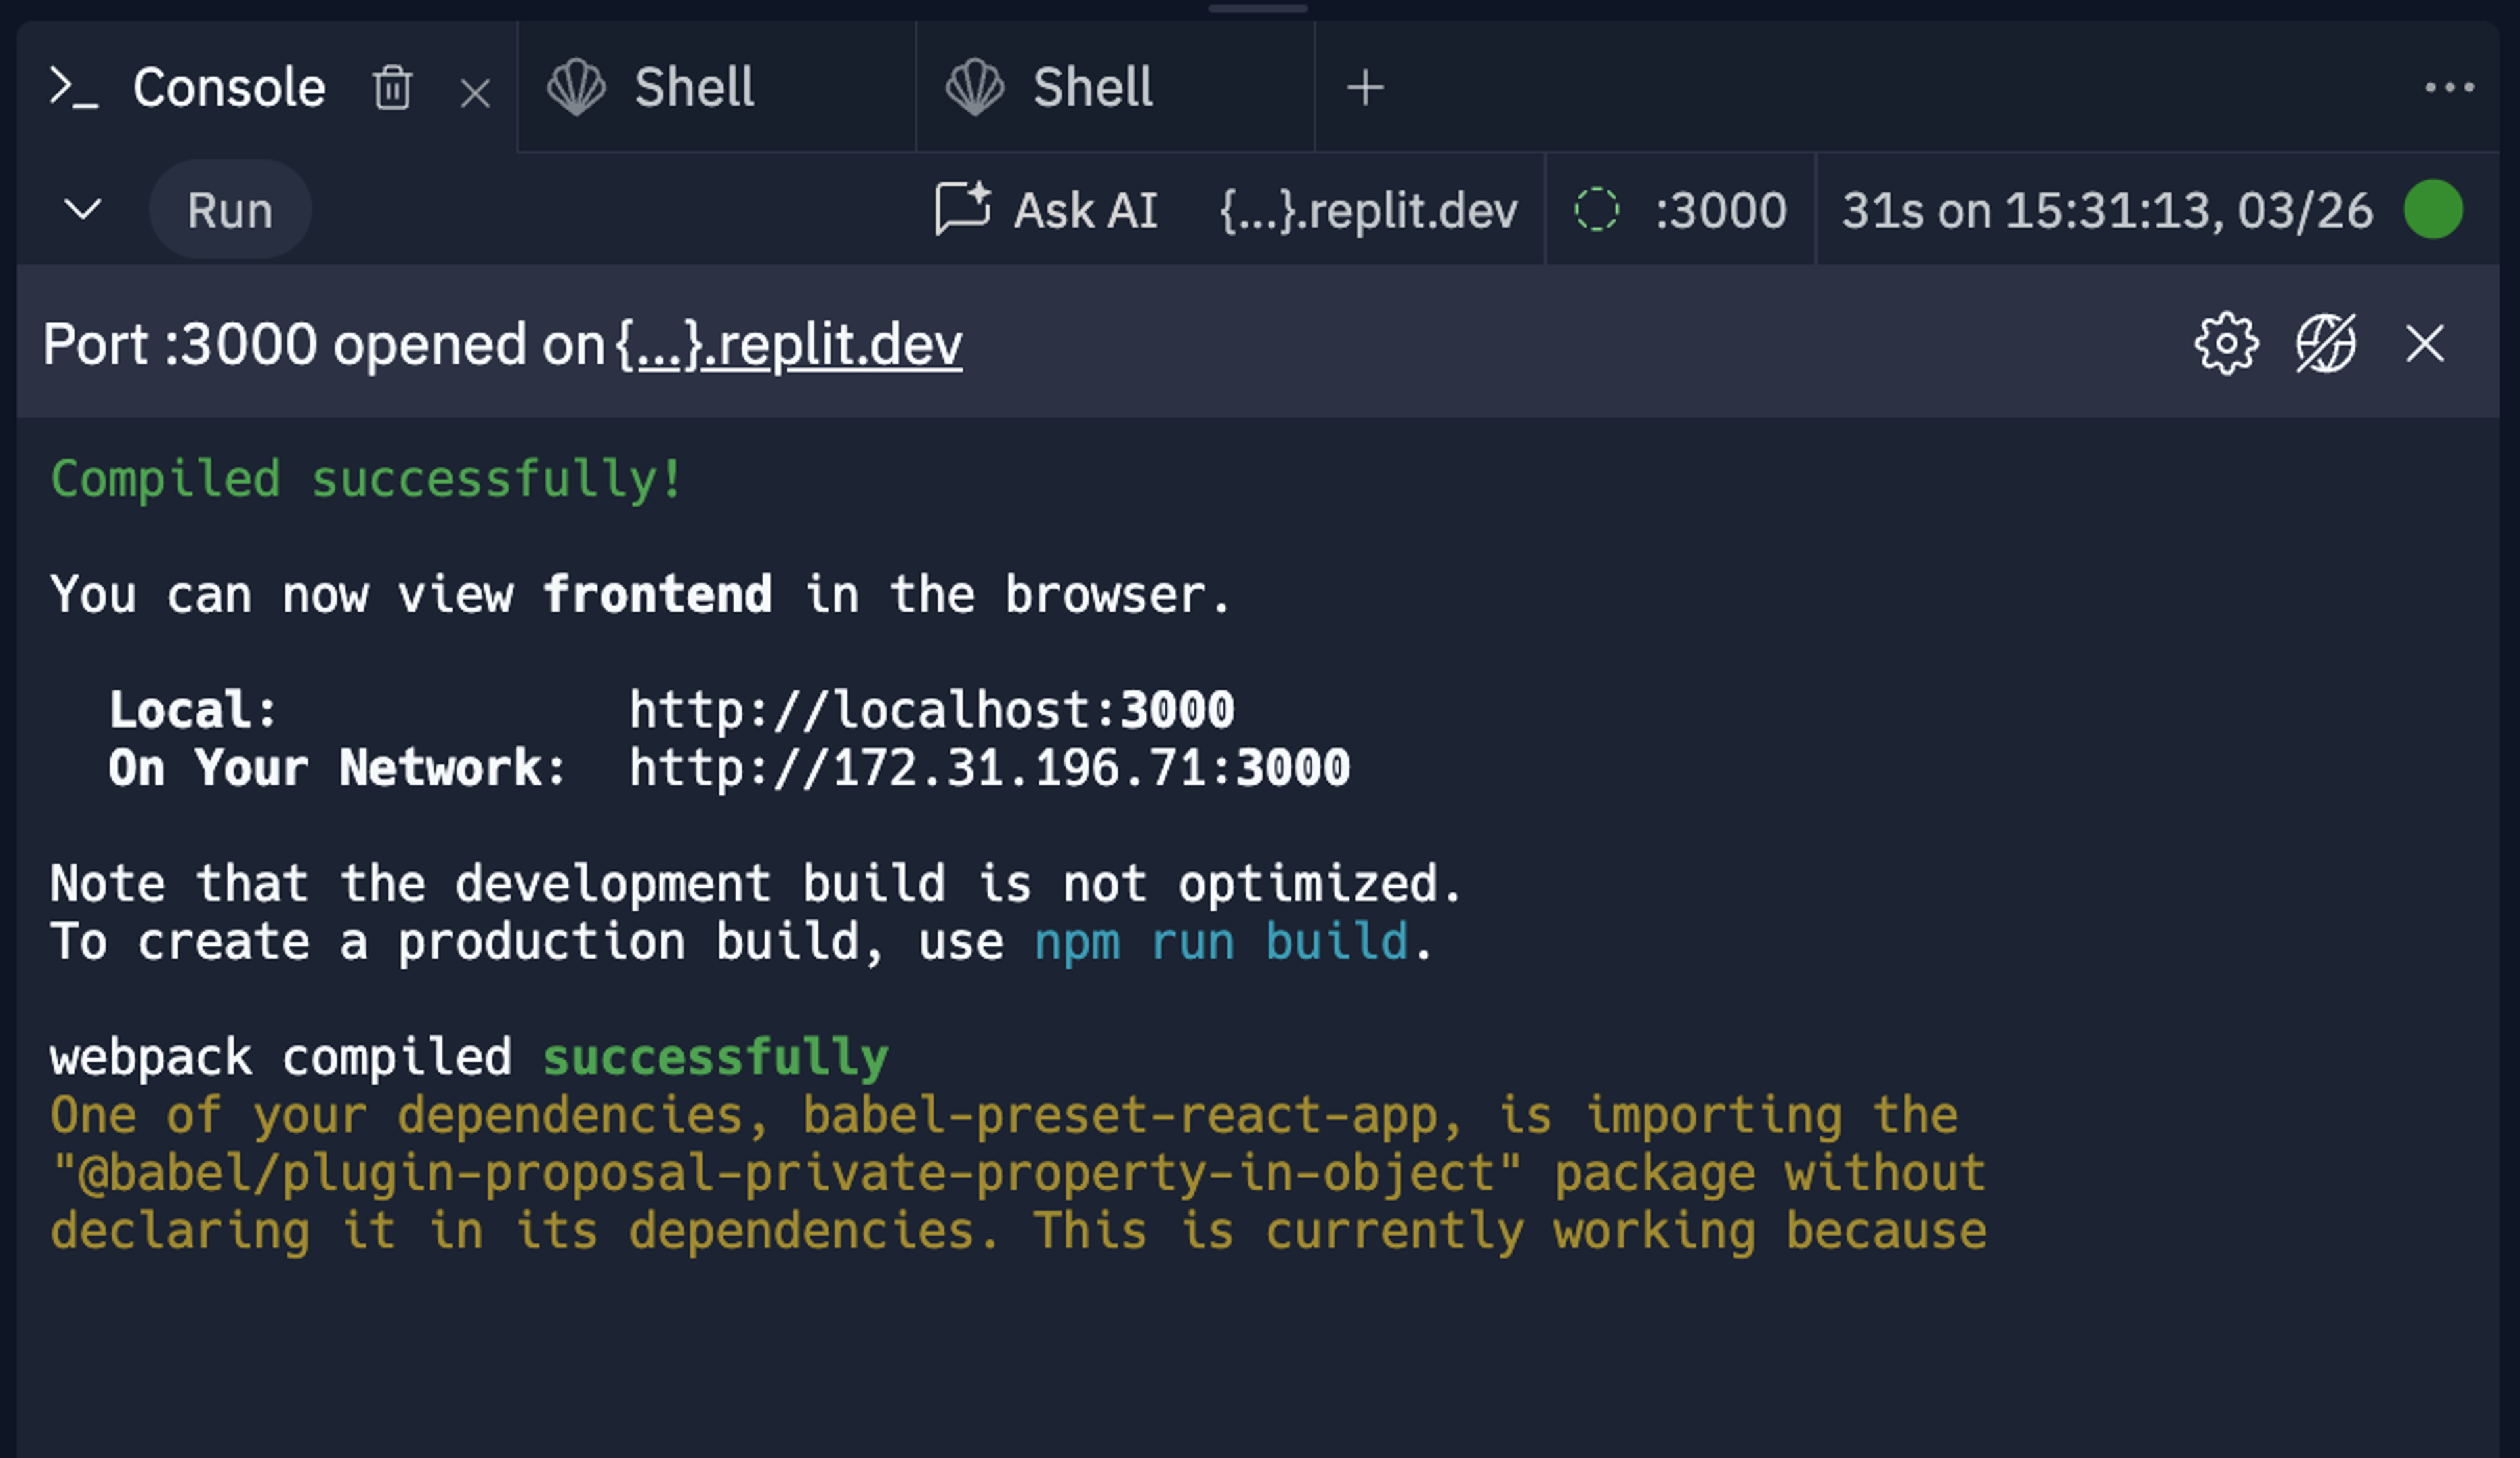
It was extra confusing when you ran processes and saw that the Console and/or Shell looked like they were running successfully on a localhost port. Many people would naturally attempt to access that localhost URL in their browser, and it wouldn’t work, of course — localhost is relative, and their local computer wasn’t running that process — and it would seem like Replit was broken.
If you used a port other than :80/443, there was no way to access it in the UI
If you got past the localhost hurdle, there were more challenges to come. For example, the Webview in the Workspace would only show apps listening on port 80/443, which is the default port for HTTP/HTTPS. This was convenient if your process was using that port, but if not, or you had processes running on different ports you wanted to see, tough cookies! You couldn’t change it.
The way ports were assigned were unpredictable and opaque
When Replit was much less powerful, we would do many things automatically to make the experience smoother for beginners. How we handled ports was no exception. For simplicity, we would automatically forward the first port that opened in your Repl to the default port externally —:80/:443. This was pretty convenient for most small, web-based projects.
This made it hard to develop multiple services in the same Repl, which we often hear more advanced users wanting to do. (The more functionality we add to Replit over time, the more advanced requests we get to support things like this.) It also meant that deploying your Repl was less predictable — if you had two services racing to claim a port, it was hard to predict which one ended up getting deployed on that port publicly.
The new ports experience
Explicit port mappings, so that ports never change randomly or automatically
The first thing we changed is that we made ports much more predictable. Instead of arbitrarily assigning an available port to the first open port, we assign an external port mapping permanently when a port is opened in the Repl. This information is stored in the config .replit file at the root of your projects, which is also where we store other configs like the run commands.
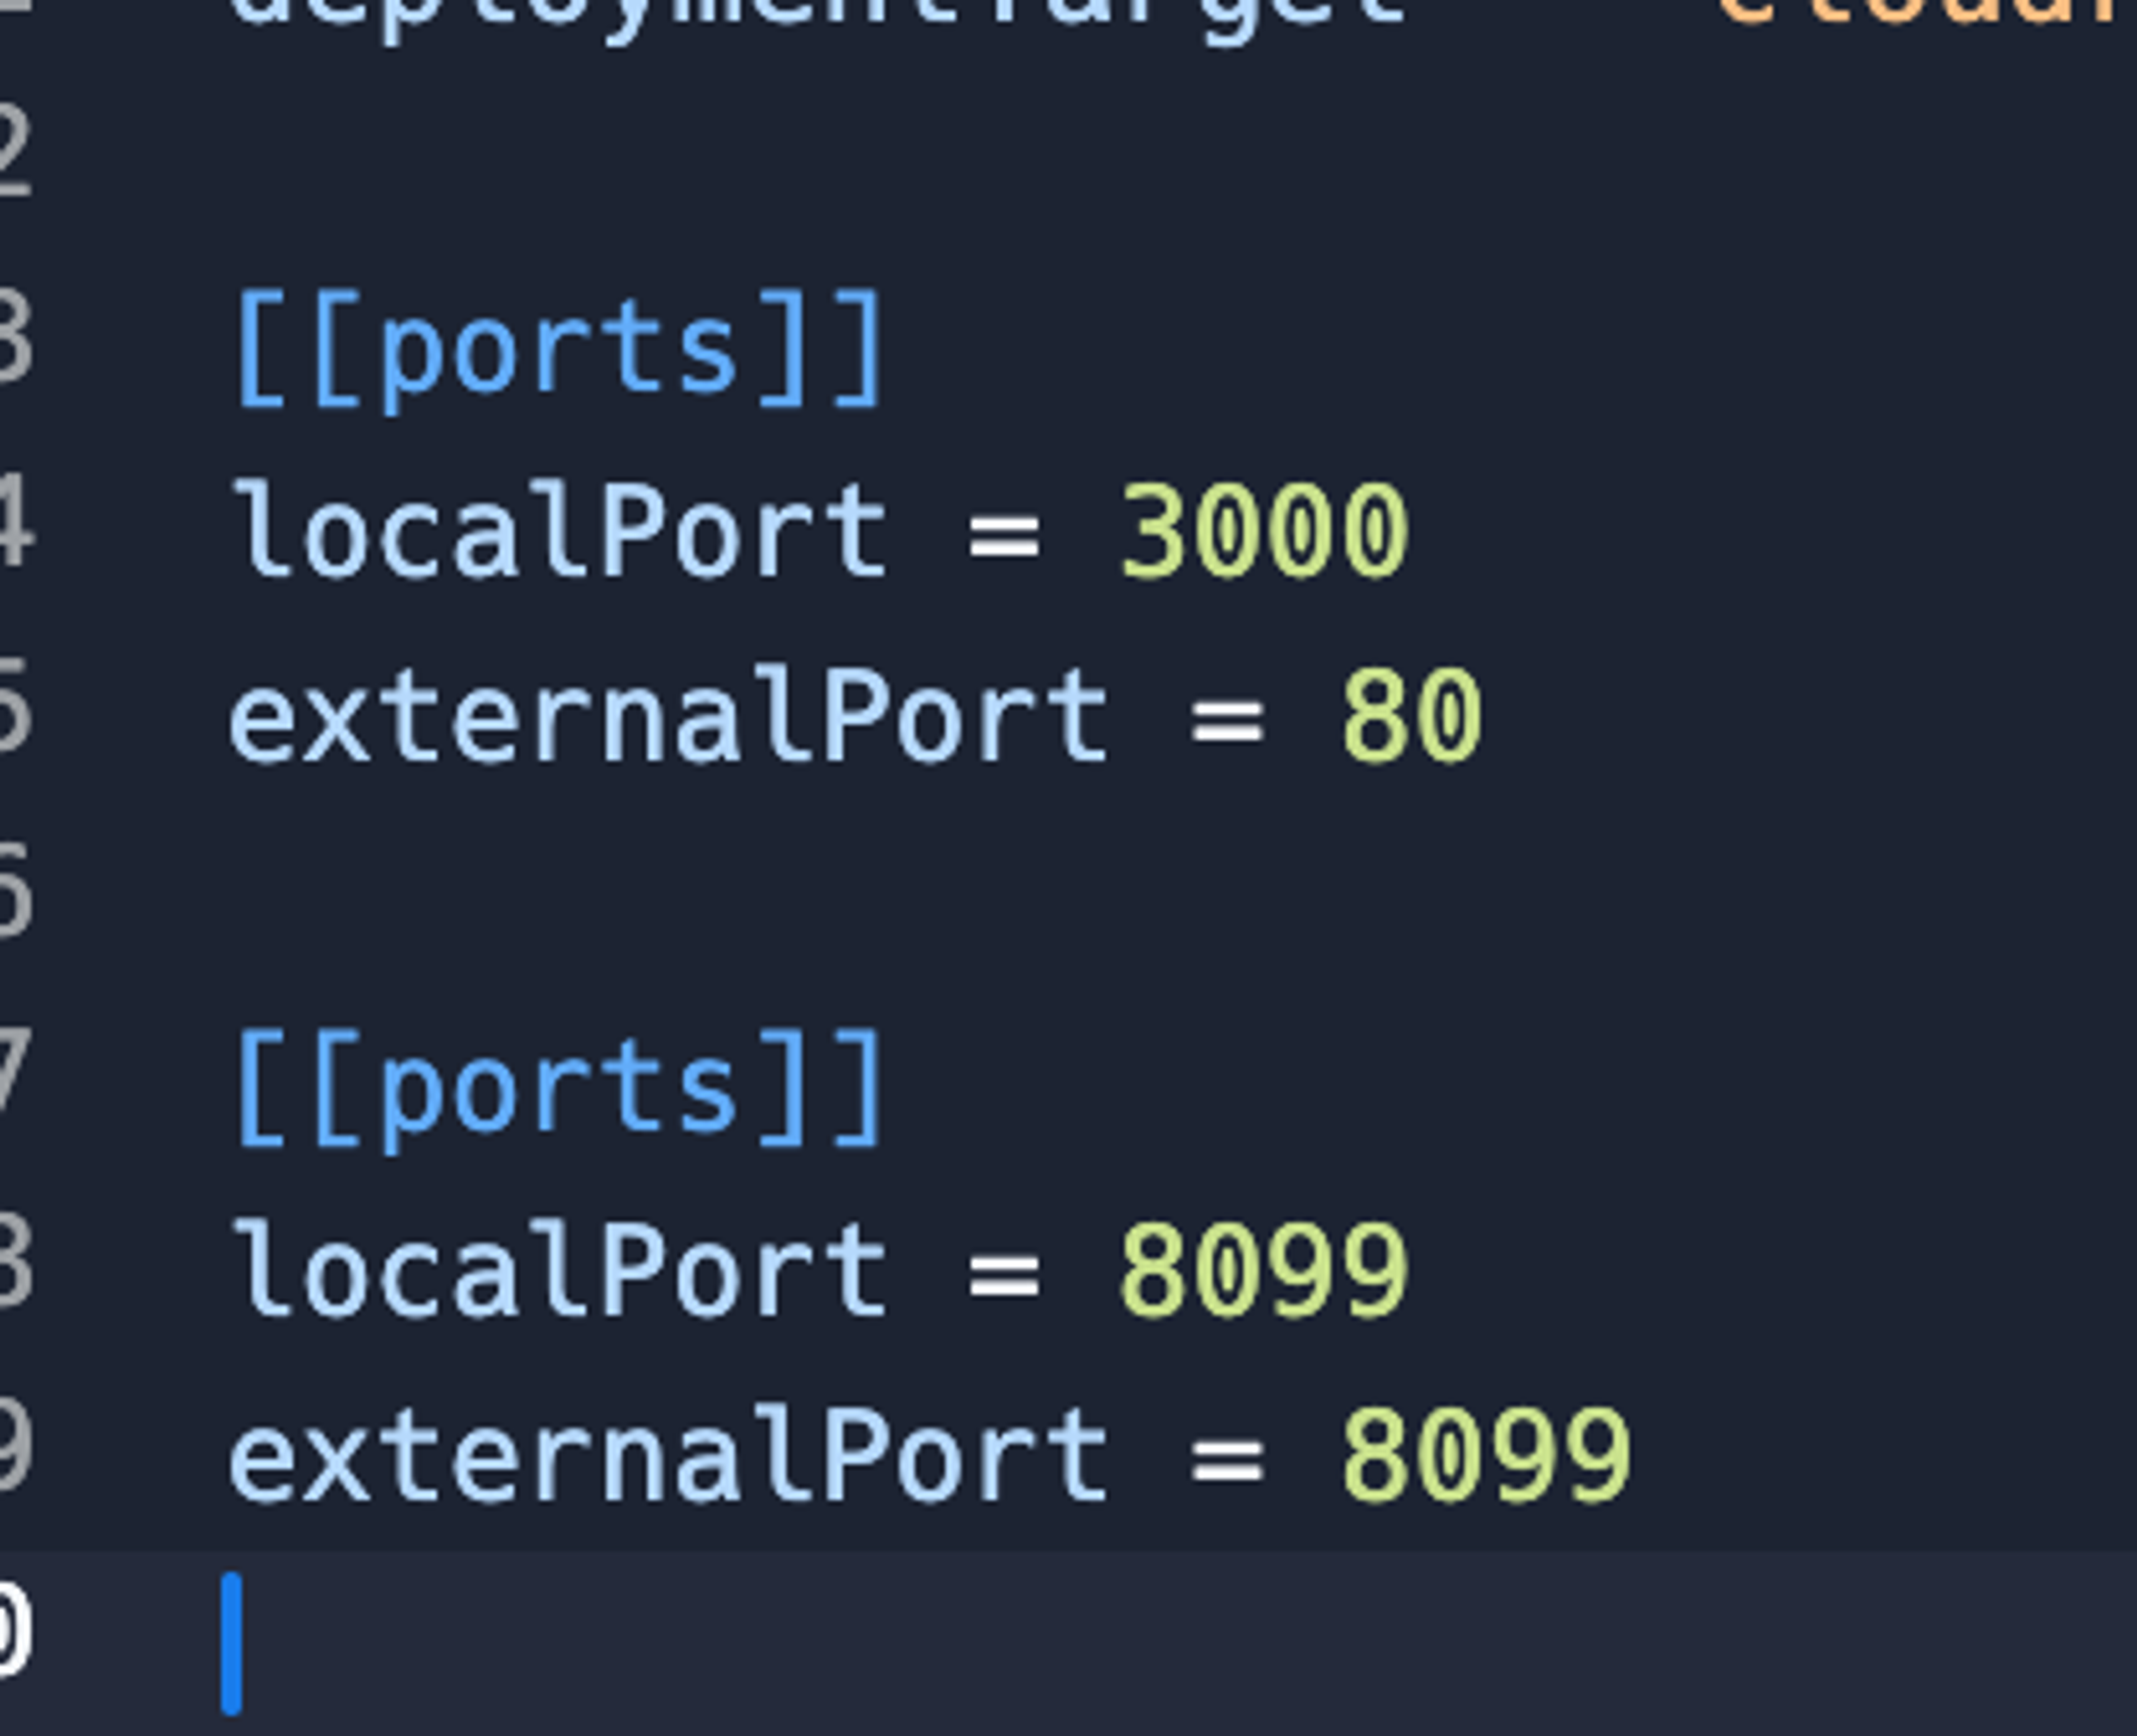
This way, you will always know which service is listening at which port. This makes it much easier to run multiple services in the same Repl (check out our CEO running three different servers with different languages in one Repl), especially if they need to talk to each other.
This also means once you set up the right port config, it can be forked and work exactly the same. This makes making complex templates more predictable.
Contextual notifications & actions when a port is opened
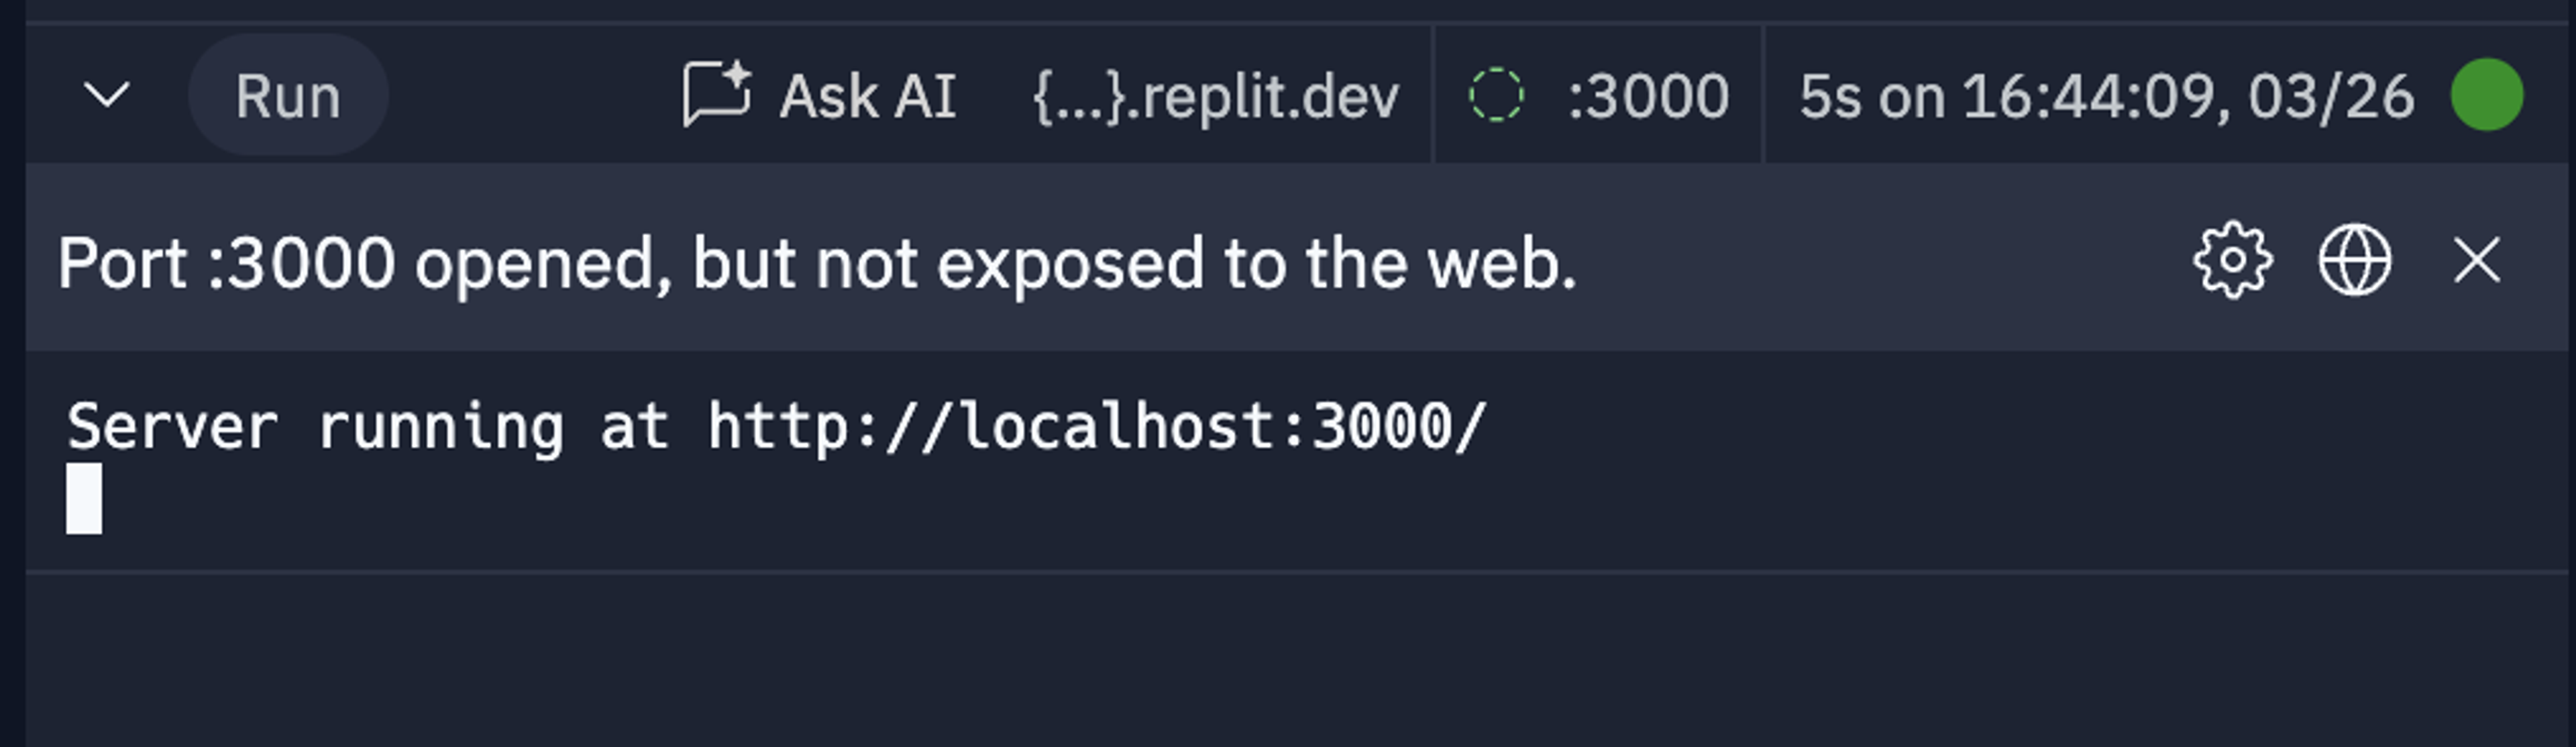
When a port is opened, we’ll actually show you in the Shell or Console, and give you a small notification that the port is open, with links to see it, configure it, or stop exposing it.
This is especially useful in cases like the one below, where the CLI is programmed to automatically show a link to “localhost” (even though you can’t access that localhost.)
View localhost ports, if you opt-in
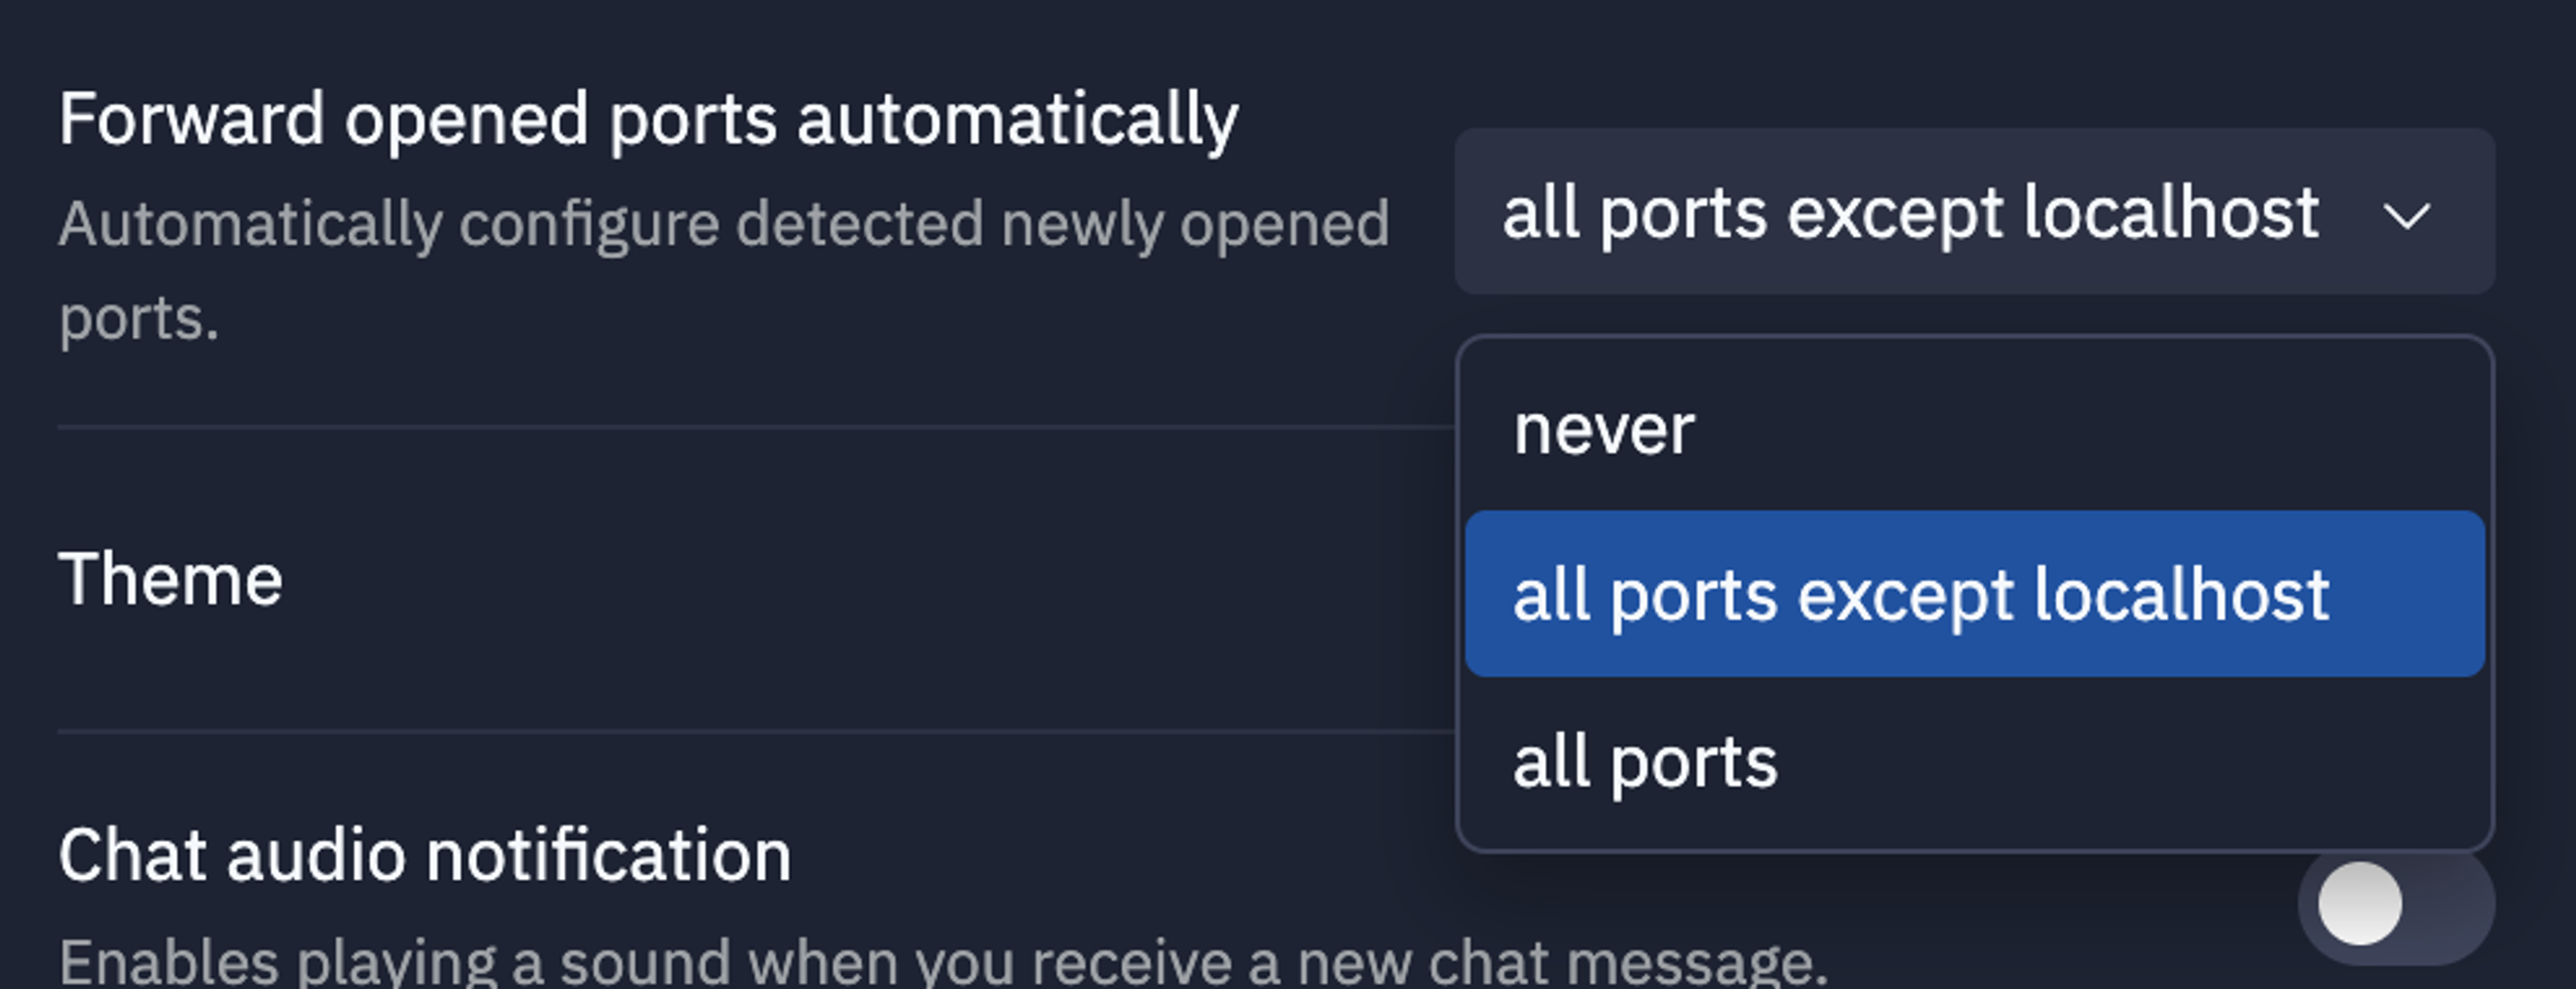
Even if we do a better job making ports more predictable, it doesn’t matter if you open a localhost port and expect it to work. We don’t want to expose localhost ports by default to the web (most dev frameworks treat localhost development less securely because they assume it’s just going to be on your local network, away from prying eyes or potential attackers). But we also didn’t want to just silently avoid having localhost work at all, because new users trying Replit might expect it to work out of familiarity with their local setup. Where we landed was to show people a little popup when they exposed a port that wasn’t exposed (like a localhost port) and give them the option to expose it if they want to. We also added a user preference to just automatically forward all ports (including localhost) if they don’t want to select Expose this port to the web every time they open a localhost port if they are okay with the security/developer experience tradeoff.
How is it possible to view localhost ports from a computer that isn’t yours? At the high level, we run a proxy server we call “Port Authority” inside the Repl. That proxy can access the localhost interface inside the Repl because it is running on that same computer. Requests are forwarded from our replit.dev proxy to the specific virtual machine the repl is running on. Then, a local proxy on that VM looks up the destination Repl and forwards the request to Port Authority. Finally, Port Authority can route the request to the server running inside the repl, even if the server is only listening on the localhost interface.
View and switch ports in the Webview preview
This one just made sense. If you have multiple ports running simultaneously, you can click on the domain in the Webview and actually choose which one to preview now:

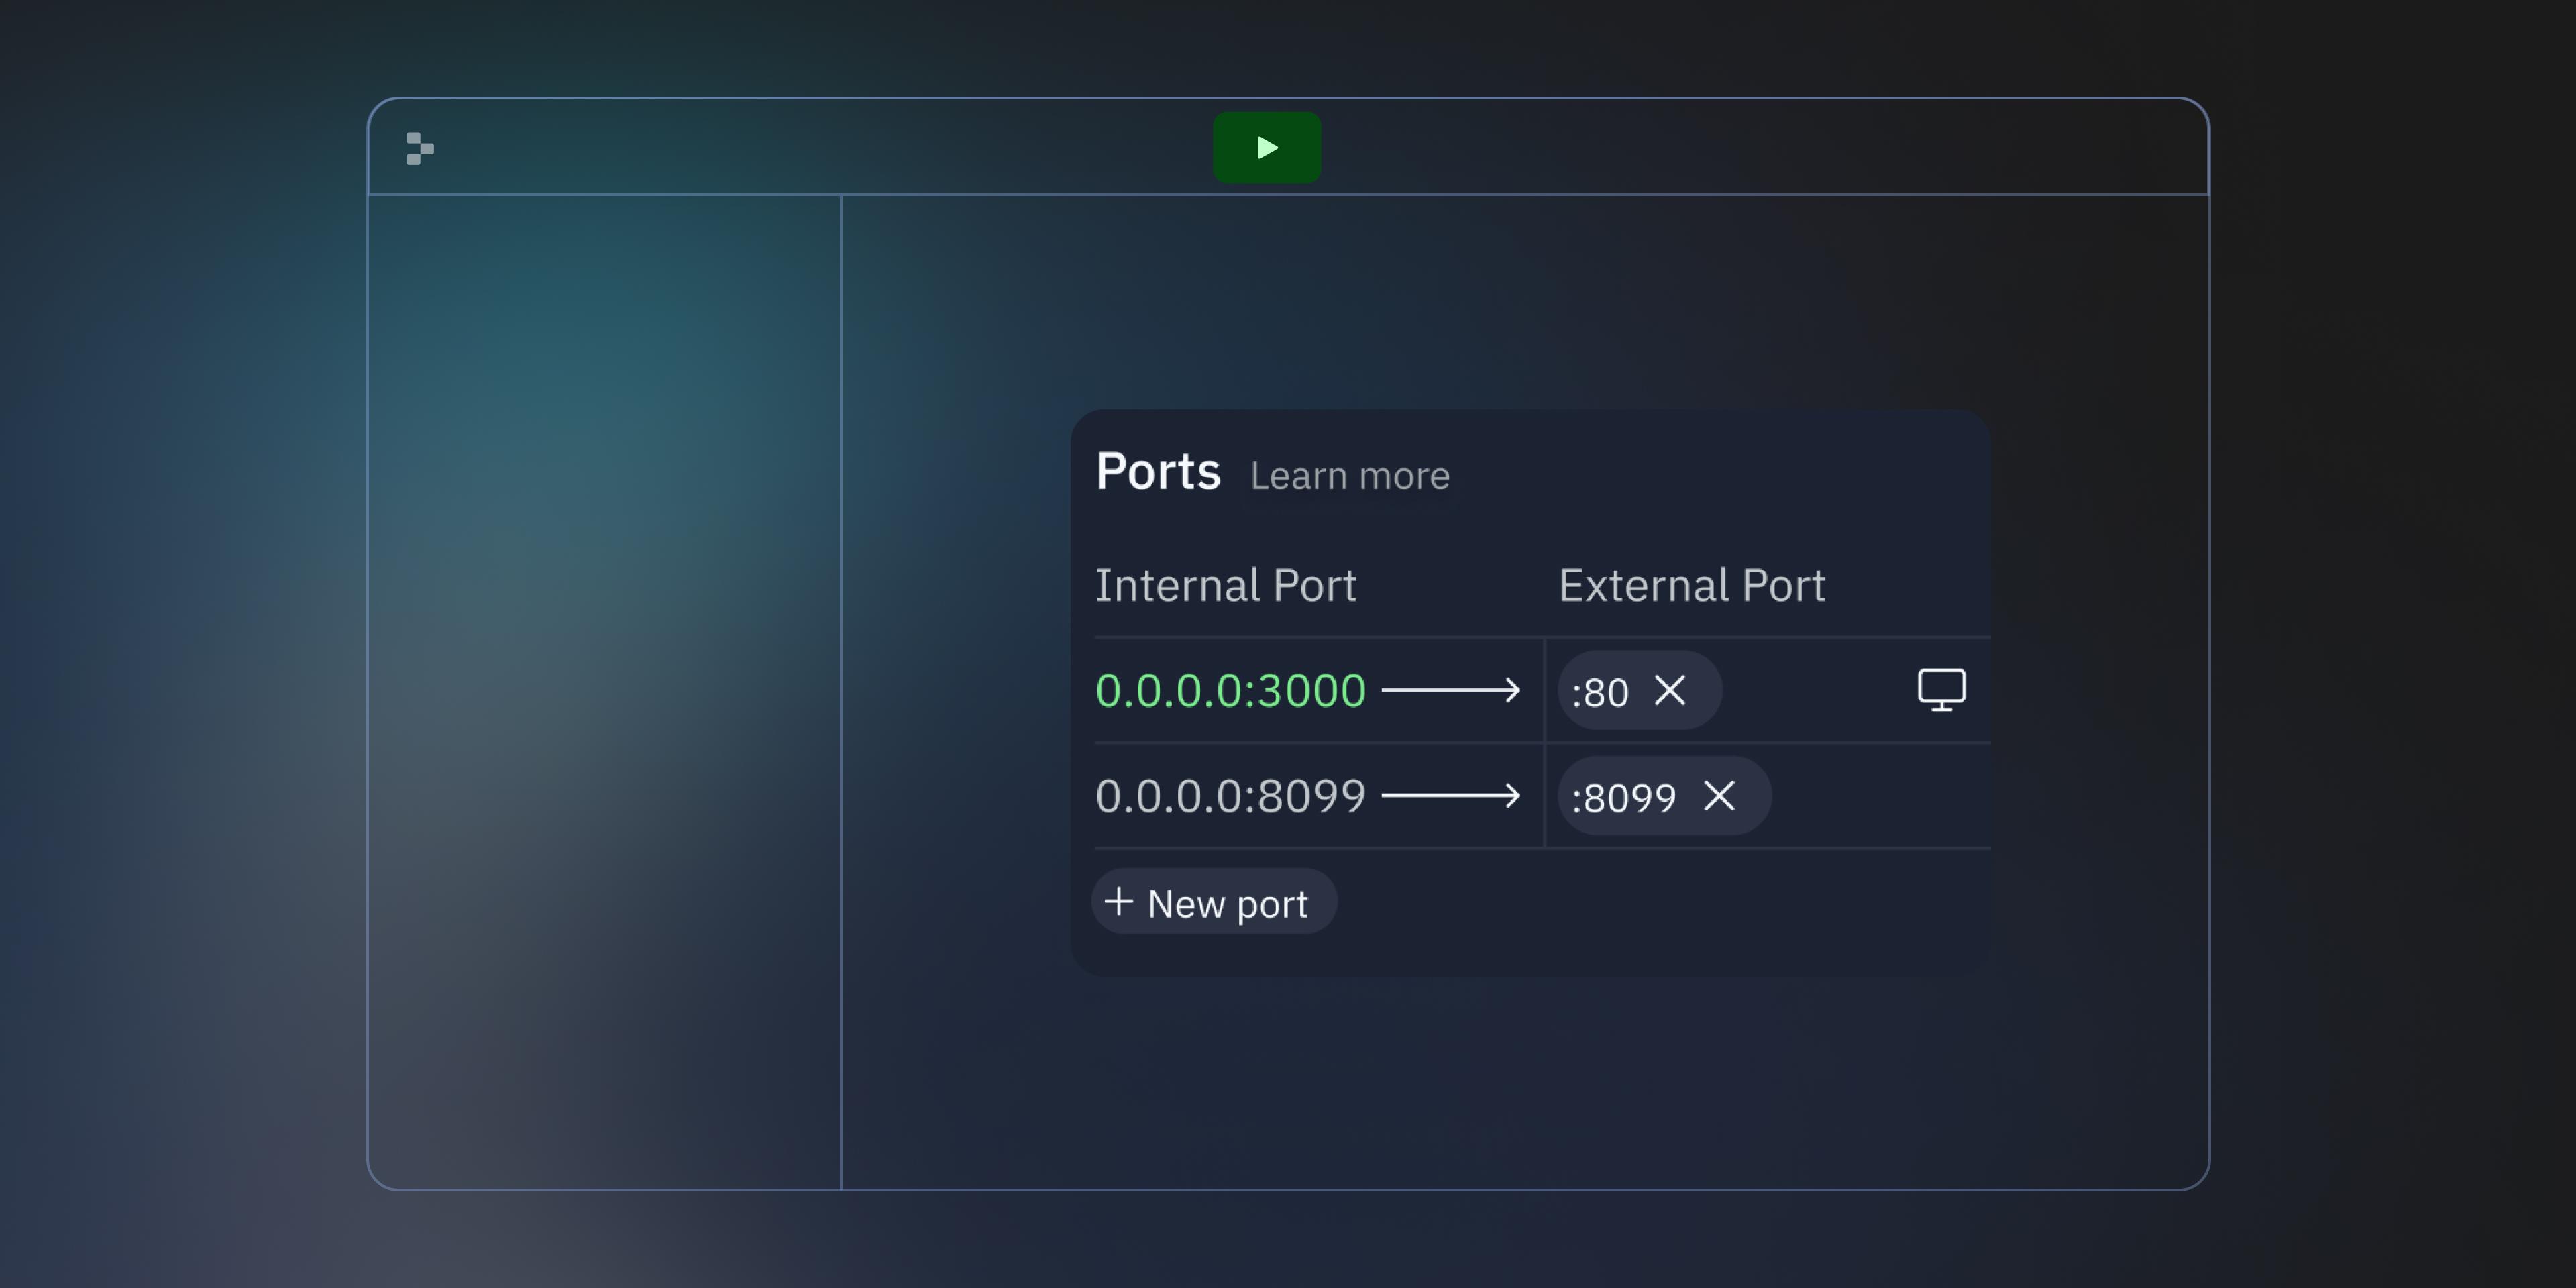
Made a Networking tool where you can see your port config
The config .replit file is hidden by default, and changing config files like that can definitely feel scary. So we also built a networking tool you can open in the Workspace to see what ports are open in the Repl, what external ports they’re connected to, and change them if you like:
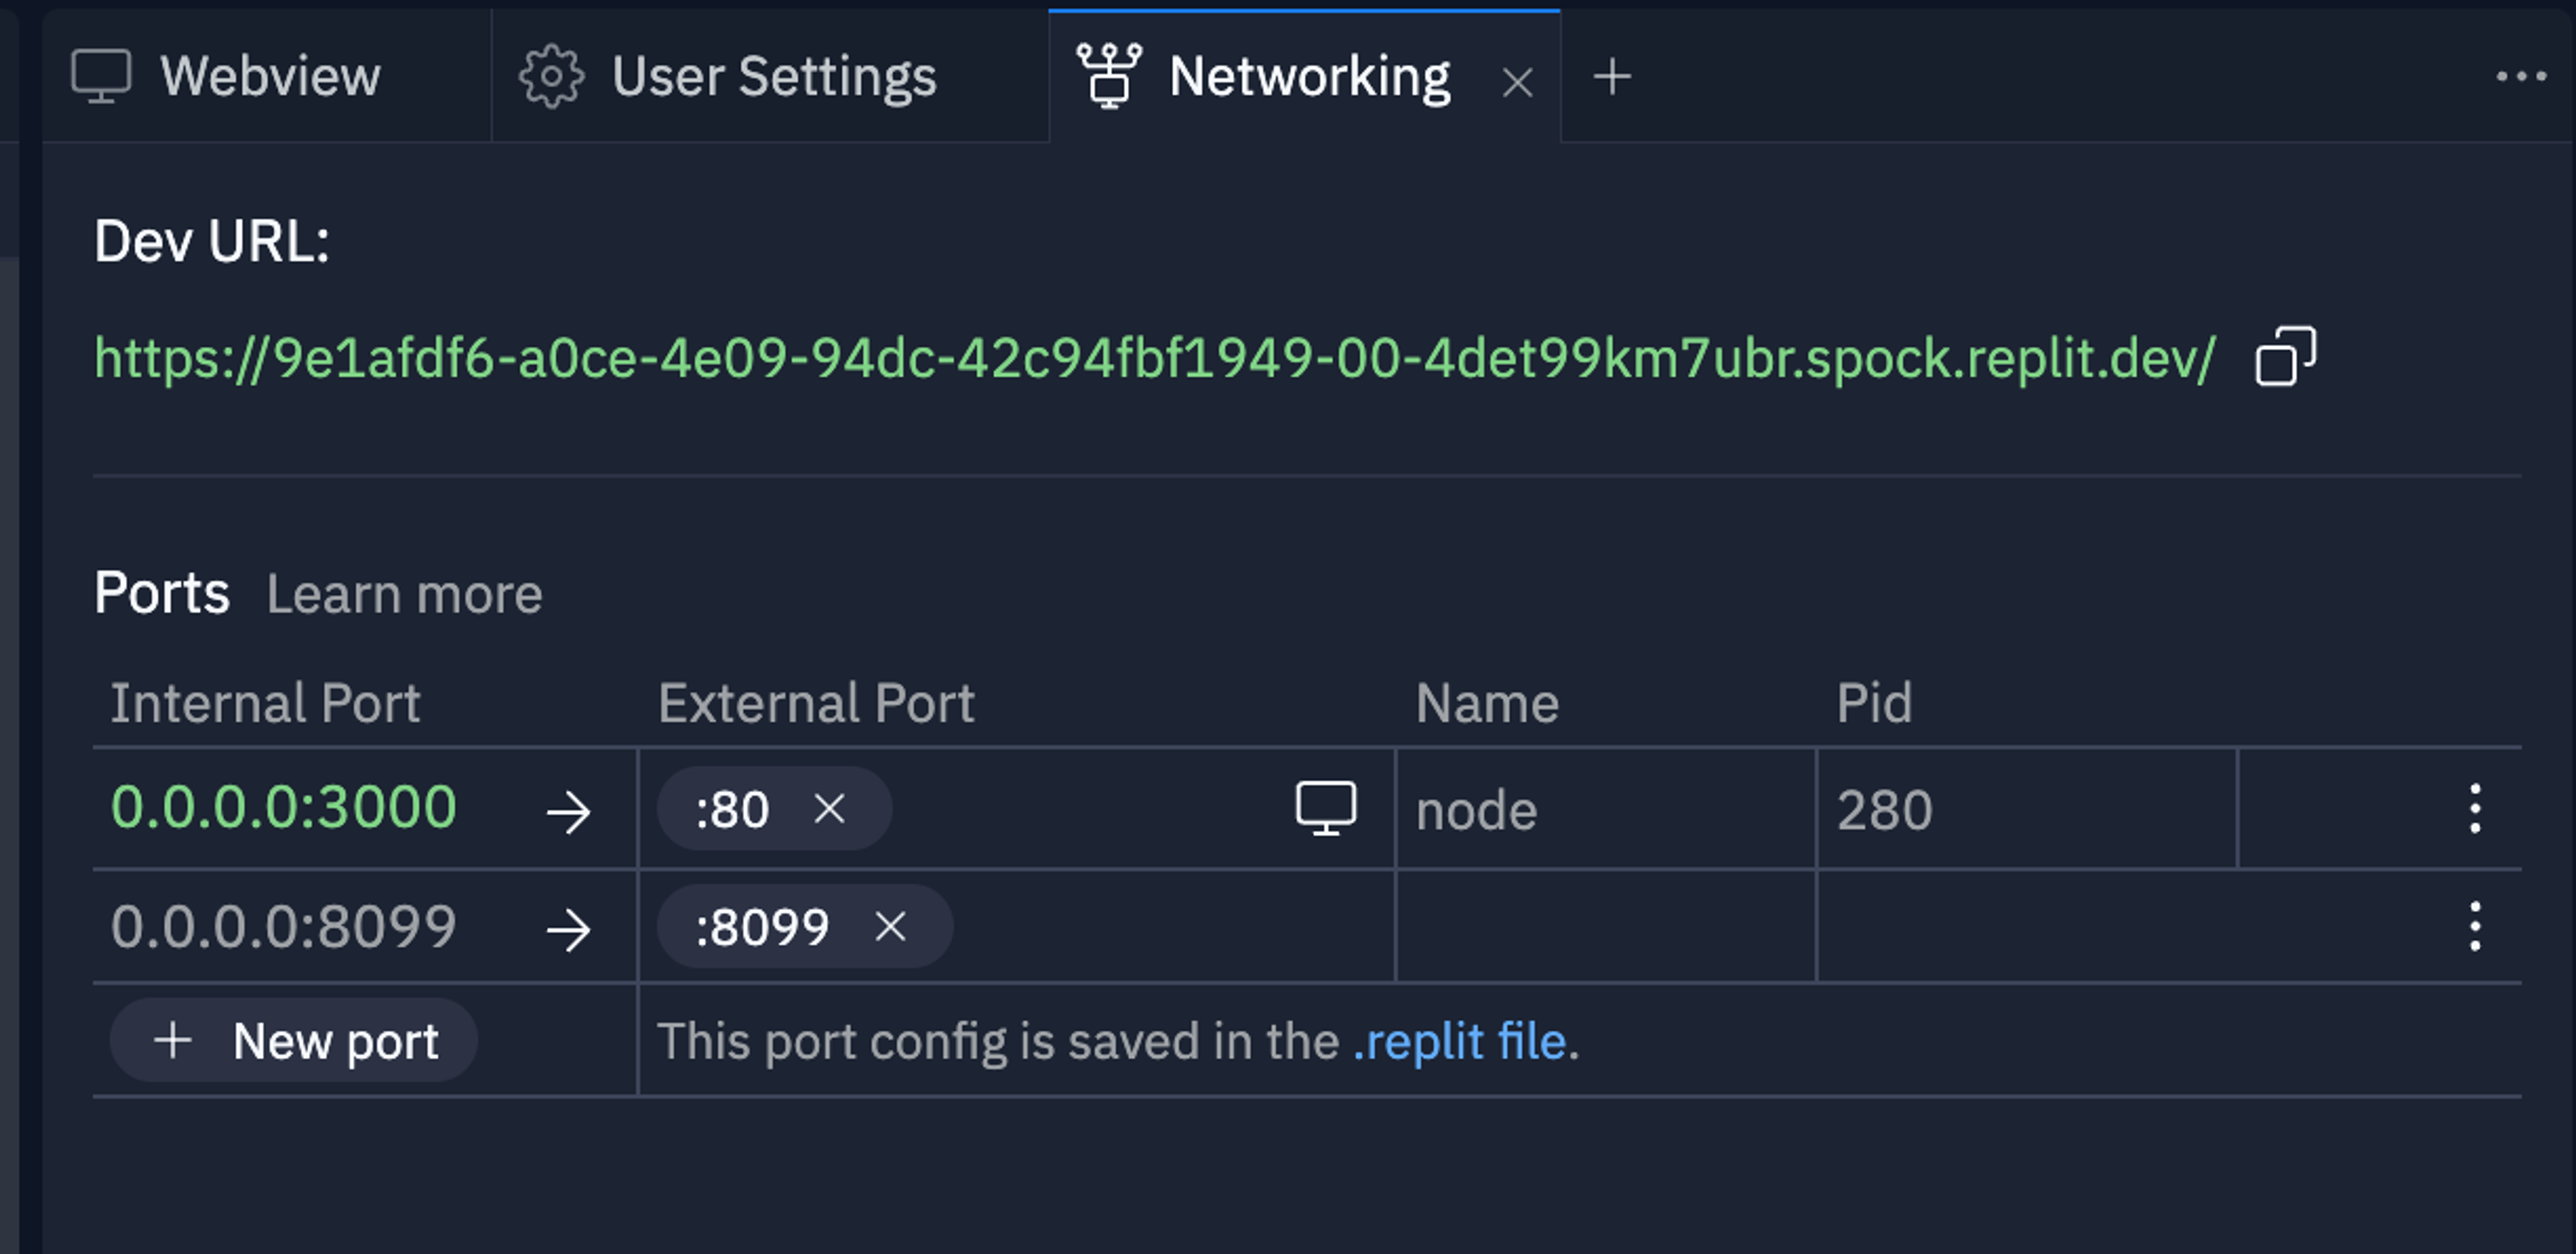
To do this, we combine the current configuration state of your .replit file with the live state of your container’s running port configuration. This lets us show context and actions in the UI, such as showing the port state (open/closed), the list of currently assignable external ports (not all ports are assignable), the port’s process name/id, and quick access to remove, update, or preview.
Replit engineers Szymon and Joe did a lot of work to keep this configuration state "sane" with four sources of truth:
- The content of
.replitthat can change by manual or automatic edits, - The edits made in the various places in the UI (the Networking pane, Console, etc.),
- The user’s preferences on what to expose and what not to expose
- The running state of the Repl
For example, we file-watch the .replit config file for updates, but we have no way to know if that edit was made by the user editing the file, or by the Repl itself from the auto-assign logic or UI clicks. To solve this, we have various timing/debouncing mechanisms and diffing to figure out what changed and if it was Replit system edits or not.
Also, depending on which port preferences you have and what configuration you created, you can end up in a state where a port is open but not written to .replit; or a port is in .replit but not open; or both. In those cases we have to clean up the states by either persisting to .replit or removing the port config.
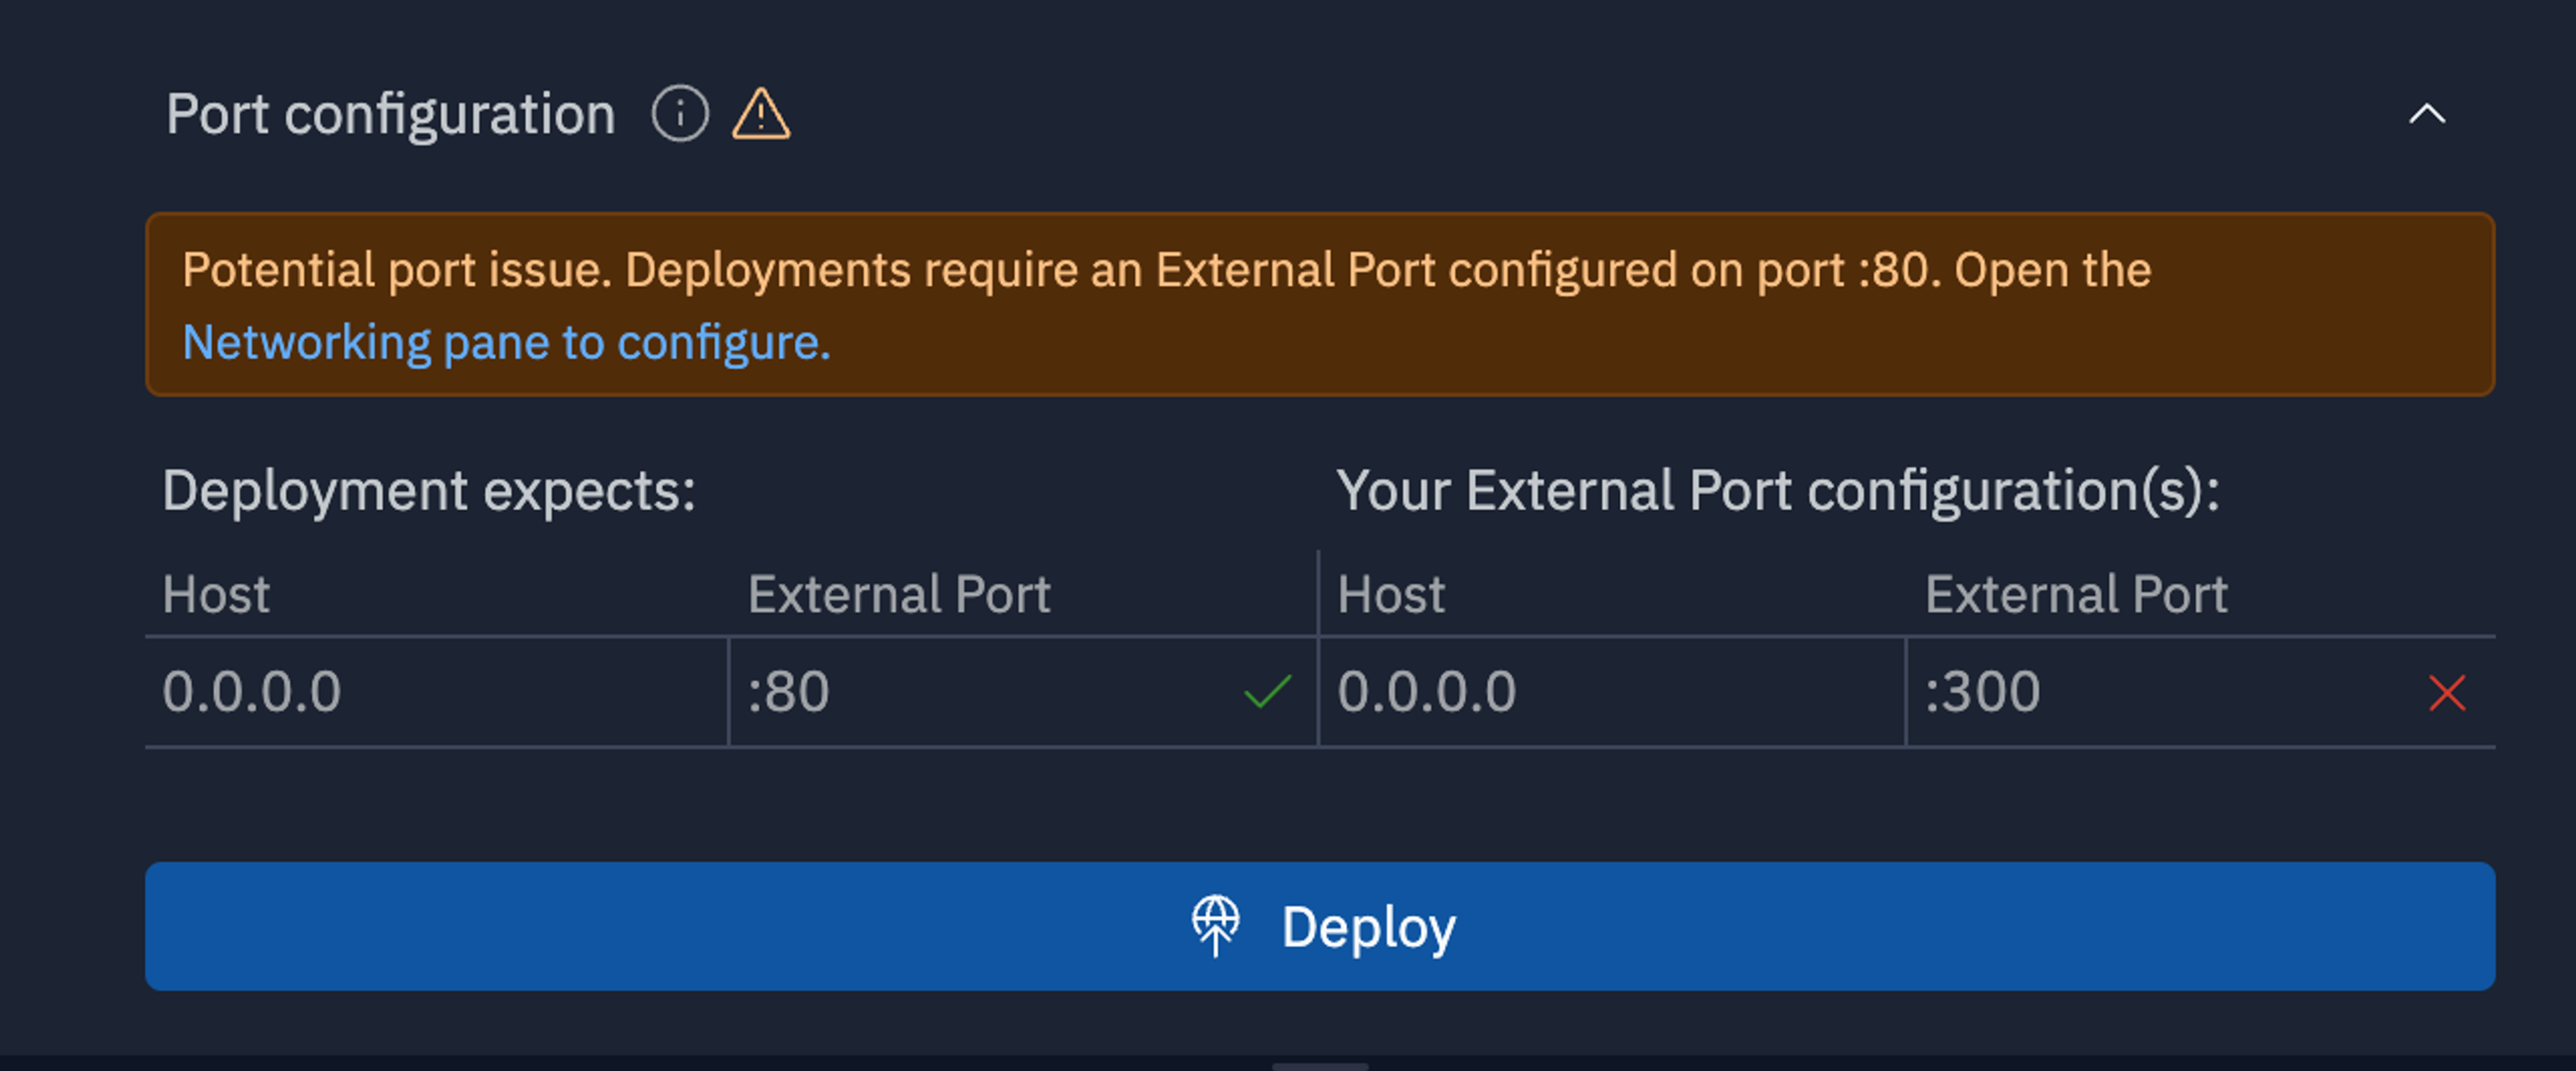
Warn you if you try to deploy with a non-ideal port config
Of course, ports are not just a concern for your development environment, but also when you’re ready to deploy to the world. This introduces additional security concerns and stricter rules to abide by when it comes to which ports should be exposed (we only expose the default port, :80, for Autoscale Deployments). In order to handle this additional complexity, we added a new "Port configuration” section to the deployment setup, which warns the user of any port misconfiguration and guides them on how best to resolve it.
As you can see, many small changes add up to make the experience of using and managing ports less unwieldy. It’s been rolled out for the past few weeks with little fanfare, but hopefully, it will make how Replit works more transparent.
We encourage you to try running different kinds of services to see how port management works now! As a starting point, you can fork this app that connects a FastAPI backend to a React frontend to display NASA data. It opens two ports — one for the API and one for the front end — and they talk to each other.
What’s next for ports? We want to enable the deployment of services that expose multiple ports on a single machine.
This project would not have happened without the valiant effort of: Connor Brewster, Szymon Kaliski, Joe Thom, Luis Chávez, Ryan Mulligan & Sam Bartlett